Full steps for Uploading Joomla to your website server
After having developed and tested your website on a local server, the next big challenge is uploading the website to your affordable website server and updating the configuration such that you "go live". The tutorial below gives you the steps required to transfer your Joomla website from localhost to server. With a few tweaks, these steps also apply to move Joomla site to new server if you want to switch to a better hosting service.
{autotoc}
Given that you're considering moving your website, we would highly recommend having a look at our review of InMotion hosting and VPS, before you make your decision to which host to move.
We've also got 47% off hosting plans for CollectiveRay users until December 2025. They also offer completely free migration or assisted transfer of Joomla site from localhost to server.
Check out InMotion hosting deals in December 2025
Transfer Joomla Site From Localhost to New Server
If you are in a hurry the steps are as follows:
- Copy to the files from the root folder of the localhost to the server using FTP or File Manager
- Export the Joomla database from the localhost phpMyAdmin
- Import the Joomla database to the phpMyAdmin on the server
- Update the configuration.php to make sure you have the correct details
- Test and Go Live
Whilst this tutorial is describing the steps for uploading Joomla to your web server from localhost or your computer, the steps if you want to perform a transfer from one Joomla server to another are exactly the same, so you can also follow these steps to do this.
The difference is that you will be doing this via the CPanel of your Joomla hosting.
These are the exact steps we've used to move our website, CollectiveRay, to different hosts for different reasons.
Video Walkthrough of Joomla Upload
https://www.youtube.com/watch?v=olIlR32HGsY
Upload Joomla files to your Joomla server
The first thing you need to do is transfer the files to the webserver where your live site will be hosted. To be able to do this, you will need either:
- FTP (FTP is a way of allowing easy transfer of files across the web) access to your web server,
- or else upload a zip file of all the files directly.
Note: if your hosting company has already installed Joomla for you, do not overwrite the configuration.php files. This contains very important details regarding your Joomla hosting company. You should keep a backup copy of this file. All other files can be overwritten, such that you have all the configuration you have done on the local installation.
Using FTP
FTP access typically consists of:
- FTP Address - typically this is something similar to ftp.yourdomain.com
- FTP Login details - username/password to access the FTP area
This information is given to you when you apply for a hosting account with any hosting company. To access the FTP area you will need an FTP client. A free and easy to use FTP client is FileZilla.
Download and install this client and then enter the information to your FTP area. These should be similar to the image below:
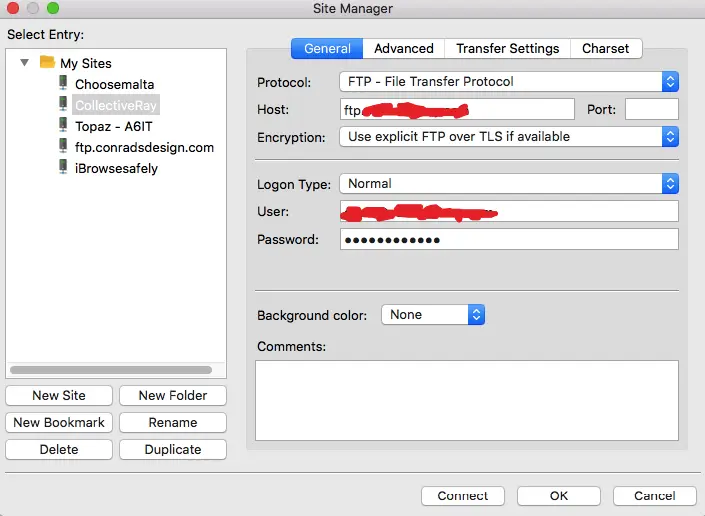
Once you have connected to your Joomla server, upload all the files to the host.
This is done by selecting all the Joomla files from your local hard drive and dragging them to the window which is connected to the host. This will start the transfer of all your Joomla files to your hard disk.
Using File Manager
If your hosting is using CPanel or has a File Manager as part of the hosting account, you can perform the transfer in a much faster way.
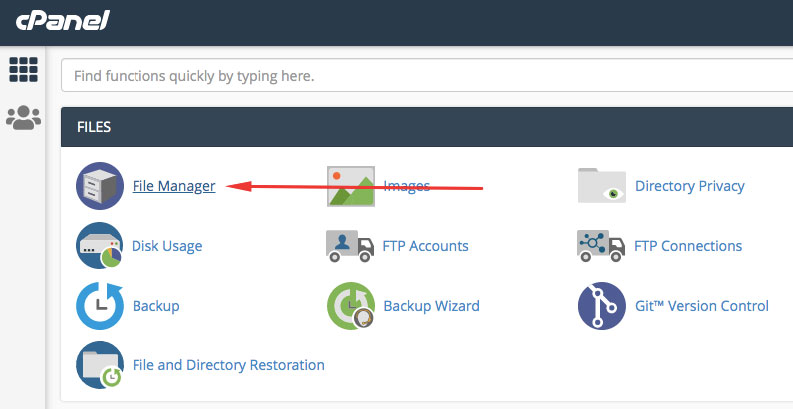
- The first step is you'll need to ZIP or archive the root folder of Joomla on the localhost
- Upload the file directly to the root folder of the hosting account
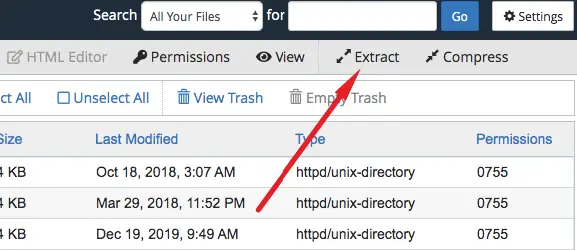
- Uncompress the zipped file so that you get a copy of the files on the Joomla server
Export / Import the Joomla database
Warning: the following steps about exporting/importing the Joomla database are significantly technical. Please be aware of what you are doing because you may create a real mess.
In particular, most configuration and data of Joomla extensions (such as the one's CollectiveRay mentioned here) all store their data and configuration in the database, making this a critical part of your process.
The next step to transfer the site you have created locally to the webserver is the transfer of the Joomla database from your local MySQL, to the webserver database. This consists of two steps
- Exporting your current local database
- Importing the exported database to the MySQL database on the hosting company's server
Export the localhost Joomla database
To export your current database you need to use the phpMyAdmin located on your local server and export the database.
The phpMyAdmin URL differs depending on the local development server you are using. If you are using XAMPP to test and develop your website, you will find phpMyAdmin at https://localhost/phpMyAdmin
Choose the database which contains the website you want to upload and export it to a file.

This step depends very much on the phpMyAdmin you are using.
However, there should be an Export link. Export all the tables. Once the database has been exported to a .sql file, you should open the file with a text editor, and check that the file looks ok. It should contain the Joomla tables.
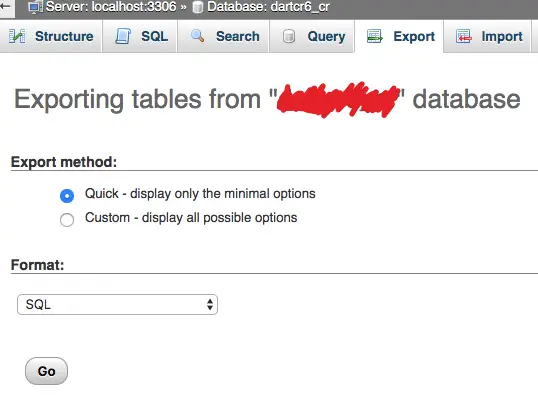
Make sure there isn't a Create database line. The database should be created manually.
Import to the hosting MySQL database
Once you have exported the database, you need to import it on the host.
Your hosting company should be able to provide you with access to MySQL. If you still haven't created a database you should create it now.
Take note of all details, especially the address of the server where the MySQL resides, the name of the database, username, and password to access the database. If the Joomla database has already been created previously (using the Joomla installation procedure or otherwise) you should use the details given to you when creating the database.
Log on to the phpMyAdmin interface, find the import tab, and import the file you have exported above. Once again, the location of the Import link varies depending on the phpMyAdmin version being used, however, this should be fairly intuitive.
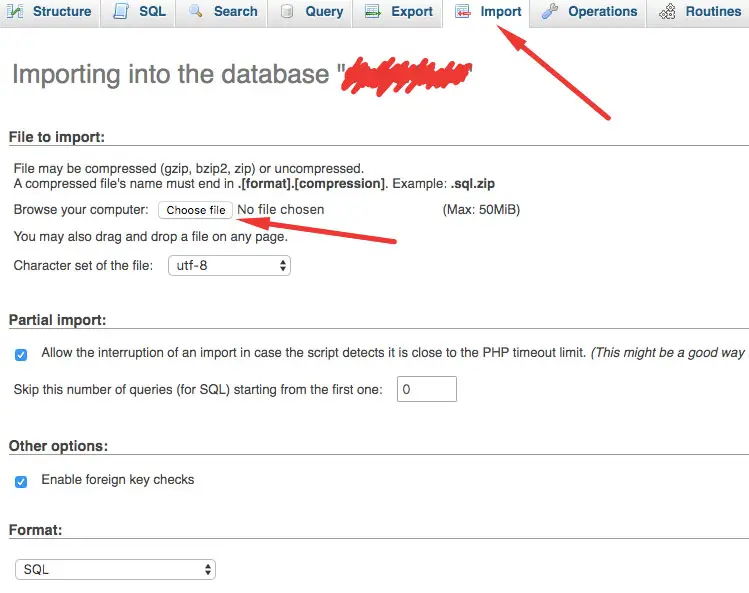
If you have a problem to do this, your hosting company will help you to import this file to the database correctly.
Set the configuration.php correctly
Up to now, if you try to access your website, you will probably be given an error.
This is because the configuration.php file you had on your local server does not contain the information related to your hosting account details. As stated previously, if your host has already installed Joomla for you, you should leave the configuration.php file created unchanged.
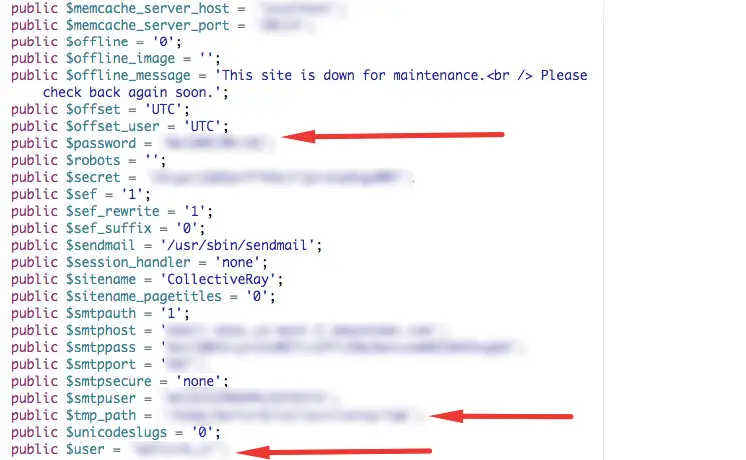
Otherwise, you will need to change the following critical details:
Joomla 3
- public $host = 'localhost'; - this is the address of the server which is hosting your MySQL database
- public $user = 'sqluser'; - this is the name of the username which will be used to access the Joomla MySQL database
- public $password = 'p@ssw0rd'; - password for MySQL database
- public $db = 'j15stable'; - MySQL Joomla database name
- public $log_path = '\home\logs'; - the path where any log files will be stored
- public $tmp_path = '\home\tmp'; - the path for tmp files
Once all these entries in the configuration.php file have been given the correct values, Joomla should be able to access the database and code, and thus if you go to the address of your page, you should have a working Joomla website with all the customisation you have done.
If not, one of the above settings is probably incorrect, or you might need to configure some settings further.
Test and secure the website
Go through all the website, to make sure that everything has been set up correctly.
Since you should have uploaded the website, most of your settings should be correct. However, you might still have some minor configurations to do, so go through each page and area to test that everything is working correctly.
You should also take all the steps to secure your Joomla website.
The Easy Way Out
As you can see, the steps are fairly complicated and require quite some knowledge of various technologies.
This is not something that should be attempted by someone who does not have experience or who does not understand what is going on. If you think these instructions are too difficult to follow, you can ask a third party such as CollectiveRay :)
You can also check out InMotion who will also help you migrate your website from your localhost
Go Live
Start marketing your website :)
If you feel that any section of this tutorial requires further details, please comment below and we will be glad to edit the article to provide more information.
Found this article helpful? Please share it, here are a few more articles you may want to read:
The complete guide to search engine optimization for Joomla!, how to make Joomla load faster, and great ways to increase website traffic with social media!
