
The power of a CMS like Joomla is that is powered by a database, making the whole site and content dynamic. But when it comes to performance, this database infrastructure is the Achilles Heel. Fetching the content from the database on every hit is a performance bottleneck. But there is an excellent middle-ground, using the Joomla cache.
In this article, we're going to provide the ultimate guide for using multiple forms of Joomla cache to give your website an instant and excellent performance boost.
What is a cache?
According to Wikipedia:
A cache is a hardware or software component that stores data so that future requests for that data can be served faster; the data stored in a cache might be the result of an earlier computation or a copy of data stored elsewhere. A cache hit occurs when the requested data can be found in a cache, while a cache miss occurs when it cannot. Cache hits are served by reading data from the cache, which is faster than recomputing a result or reading from a slower data store; thus, the more requests that can be served from the cache, the faster the system performs.
But what does this mean in terms of Joomla?
When a visitor accesses your website, Joomla would typically run a series of queries on the database to fetch all of the information, such as menus, content, modules, and other dynamic content and render it on the fly.
As the amount of data in your database grows, or your site gets more and more visitors, the performance of the overall set up starts to degrade. Even with few users, on shared hosting, the performance can be slow, irrespective of whether your site is getting a lot of visitors or not.
When the Joomla cache is in use, instead of hitting the MySQL database with the same queries over and over again, your first hit stores the data to a set of local files (in the Joomla cache directory). Subsequent hits will retrieve the content from these files, instead of from the database.
This is because reading data from a local file is many times faster than reading it from a database.
This means that the whole website will be loaded almost instantly and will perform much better. Your website will feel faster and be able to support more simultaneous users.
Here is what the whole concept looks like in an image:

Please note, that this is different from browser caching - browser caching is something that is recommended by the webserver (but done by the local browser). Server-side caching, on the other hand, is actual caching of the resources and HTML created on the webserver.
If you want to read more about how to leverage browser caching read this article here.
Of course, the ONLY way you can really improve performance is if you switch to a faster hosting server. Have a look at our InMotion hosting VPS review here.
How to enable Cache in Joomla
Caching is a function that is implemented in the Joomla core. Therefore, activating the core Joomla cache is very straightforward.
From the Global Configuration, click on System Tab, and on the right-hand side, there is the Cache Settings section.
Click on the dropdown and select ON - Conservative Caching or ON - Progressive Caching in the Cache Settings, and put a reasonable amount in minutes. 60 minutes should be the least amount for most websites.
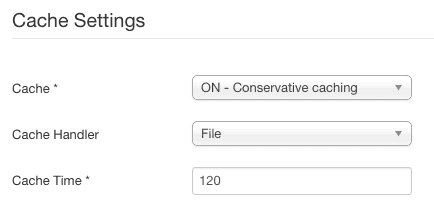
Conservative caching allows you to specify that specific modules are not cached (in the setting of the modules itself).
Progressive caching overrides this setting and caches all modules always. We tend to use Conservative caching ourselves so that we maintain the ability to decide to not cache a specific module.
In general, we would recommend that this time be longer, typically 240 minutes (4 hours) or even more. You can always flush (or reset) the cache if your want to refresh it.
Once you press Apply, Joomla caching for modules and components will be enabled. However this setting is not enough, we still have one step to go! We still want to enable page caching.
To enable Joomla page caching, you need to go to Extensions > Plugins, search for Cache and click on System - Page Cache. You need to make sure that this plugin is enabled. You can also choose to set browser caching by enabling the Use Browser Caching switch.
You can also choose to exclude specific menu items from caching, for example, the below is excluding the Contact Us menu.

If there are pages that you want to exclude from caching, you can go to the Advanced tab and specify each URL you want to be excluded from caching. You need to specify each URL you want to exclude from caching, on a separate line.
Regular expressions are also supported, for example, about\-[a-z]+ will exclude all URLs that have 'about-', such as 'about-us', 'about-me', 'about-joomla' etc while /component/users/ will exclude all URLs that have /component/users/.
Once you have enabled and Saved, you should see a much-improved web page loading time.
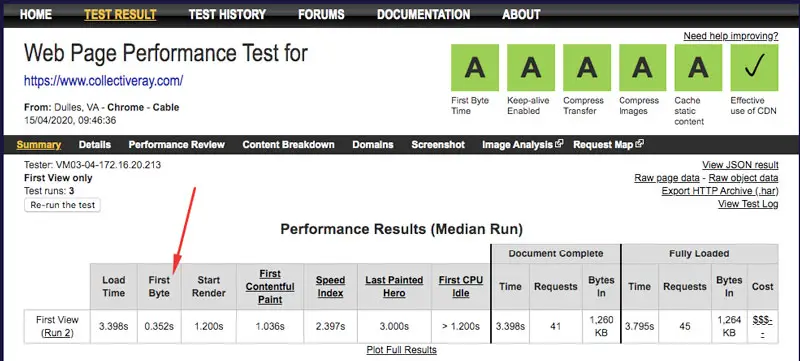
If you use a page speed testing tool such as https://webpagetest.org/ you should see a stark difference, especially if you have also enabled Browser caching.
You should, in particular, notice a marked difference in the Time to First Byte:
If your Joomla host supports it such as the hosting of CollectiveRay.com - you may also want to enable Memcache to make your Joomla website even faster!
How to Clear or Flush the Joomla Cache
When you've enabled the Joomla cache, the content on the front-end of your site will not refresh until the caching time expires according to your settings.
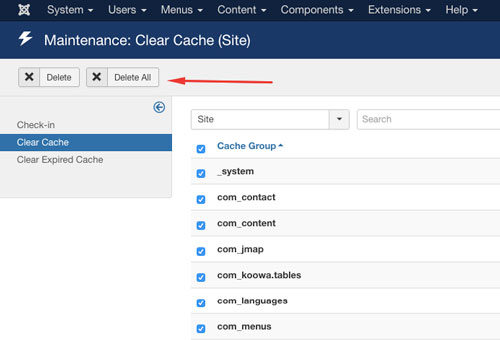
So what do you do if you want to reset the cache? This is a fairly simple procedure. Simply go to System > Clear Cache, and click on Delete All. This will flush the whole Joomla cache and the content will now be updated with the fresh content.
You could just to flush only specific parts of the cache, by selecting the appropriate checkbox and clicking on Delete.
Alternative Joomla Cache Plugin
One problem which we find with the native Joomla cache is that you cannot reset a single page only. For sites that have hundreds or even thousands of pages, resetting all the cache every time you perform a small change starts to become a bottleneck, especially if you have a lot of traffic.
In this case, we recommend opting for an alternative Joomla cache plugin that allows you to reset the page cache at a URL or page level.
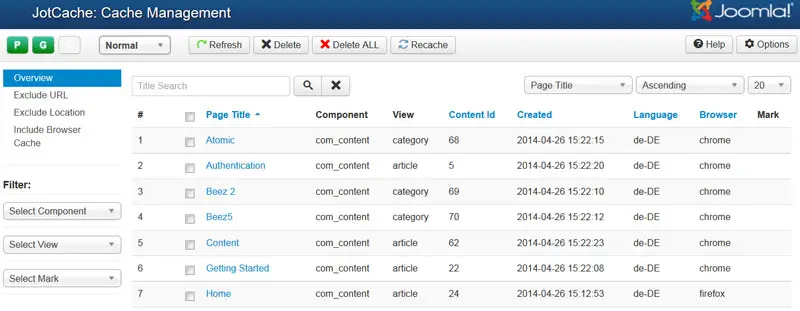
Our favourite alternative Joomla cache plugin is JotCache. Besides advanced caching settings, you are also able to warm up the cache (i.e. crawl all the pages so that they are placed in the cache before a user hits them, clear the cache of a single page only, and exclude specific URLs or whole components from caching. For example, you might want to exclude your Virtuemart component from caching, or your users module/component.
Check out the advanced settings here:

And here is the screen that allows you to reset or clear the cache of a single page only:
How to enable Joomla Memcached
One of the fixations we've had in the recent past is a fixation to make our site load insanely fast - and that's when we first heard about Joomla Memcache(d).
If this is supported by the server infrastructure, we do like to enable this. For example, some of our sites that are on SiteGround, have this enabled because it gives a nice speed boost. Incidentally, we do like the server set up at SiteGround. By default, shifting your site from a cheap shared hosting service to SiteGround will see the loading site cut down by at least 2 seconds (with no other changes).
That means they set their servers up very very nicely. But there's more to make your site fast. This is where Joomla Memcached comes into play.
Besides the default setup, SiteGround offer three levels of cache to make your site faster
- Static Cache - caches your static content (similar to what a CDN would do)
- Dynamic Cache - It creates copies of your website's dynamic content and stores them in the server RAM. This requires their own custom plugin to interface well with your site and the server it's hosted on
- The Joomla Memcached technology speeds up database calls, API calls, and page rendering by storing data and objects in memory to reduce the number of times a database is queried. SiteGround is the only company that applies the memcached algorithm on a shared server environment.
The great thing is that Joomla supports memcache by default, but since this requires some tweaking, you won't find it under the normal cache settings in the Global Configuration.
As you can see below the Joomla 3 memcached settings are hidden (you don't have a memcached option below) and need to be activated by doing a small tweak in the configuration.php file.

To enable Memcache you'll need to edit your Configuration.php and edit the following two variables:
to:
where xxxxxx is a port specified by your hosting server. Verify the information with your hosting server.
Joomla Memcache settings
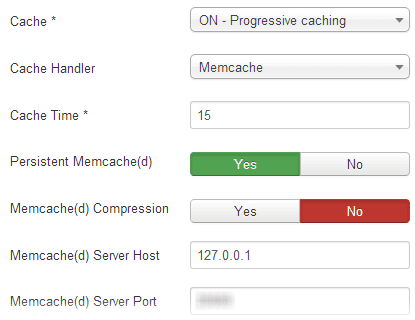
Once this is done, your Joomla is now memcached and you should see another improvement in the loading time of your website. This is particularly helpful for busy websites. Make sure you check whether your site supports memcached - if they don't, you should give SiteGround a look ;)
There are plenty of other articles about performance on this site, one of the more popular ones is how to fix the error named, leverage browser caching - we've got a full explanation on CollectiveRay.

How to Enable PHP OpCache for Joomla
The above points should already have taken your site to quite an improved loading and execution time. But there is still one thing holding your loading time back.
This is usually the time it takes to execute the PHP code itself. See, PHP is a programming language that is executed line-by-line. The server typically translates the PHP code, to machine-executable instructions and then executes them.
However, when it comes to executing the instructions again, they will be translated again. So every time the same piece of code is run, it needs to be translated again.
This is a performance bottleneck that can be solved through something called OpCode caching or OpCaching. When using OpCode caching, a new kind of cache is created that stores the previously translated machine code so that when the line needs to be executed again, the machine-executable code is already available.
Below you can see a diagram of how this works in real-life:

OpCode caching requires support from your hosting server. If your site is running on CPanel and WHM, you'll need to get ROOT access to the WHM and enable PHP-FPM or another OpCode caching package.
This also differs between PHP 7.2 and PHP 7.3 - it would be best to enquire with your hosting company on whether this is possible and how to do it. We use an InMotion VPS, so we have full control of the service, and our current setup uses PHP-FPM.
If you do have ROOT access to WHM, go to PHP MultiPHP Manager and install a package with PHP-FPM.
Once you have enabled this, you'll be able to see the following information in the PHP Information in Joomla. You can find this under System > System Information > PHP Information
You can see the Cache hits, this is an indication that PHP is fetching OpCodes from the cache not recreating them from scratch every time.

Alternative Caching Option - LiteSpeed Server
Once again, if you have a VPS in place, you can have much more control and squeeze out better performance from your server.
One of the advanced techniques we've done to make our site insanely faster is by using LiteSpeed server instead of Apache, or NGINX. LiteSpeed is an enterprise web server that is a drop-in replacement for Apache.
This means that you can keep all the configuration for Apache, but get a much faster execution time.
LiteSpeed has both OpCache and Page caching built-in as a specific Joomla component. It comes with its own advanced caching component that allows you to flush single pages only, so that if you update one page, you don't have to invalidate the full cache.
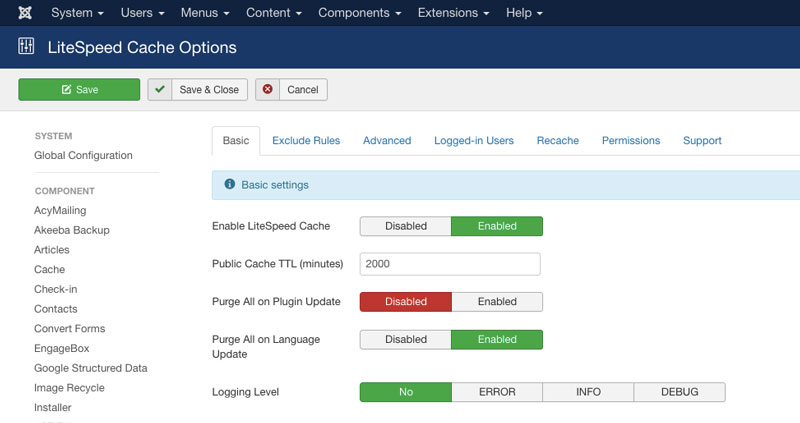
There are plenty of advanced caching options that you can use, we've used this server to get an incredible website loading speed. The LiteSpeed server costs $10/month, but we believe this is an excellent investment.
Check out LiteSpeed Server Now
Points of note:
When enabling the Joomla cache, you may notice that your "Hit Counts" are no longer increasing on each and every hit. Essentially, since you're storing a copy of the content for some time, the Hits will only increase each time the cache expires. Although this might sound like a disadvantage, we believe you should be completely ignoring hit counts regardless of whether you enable the Joomla cache or not. Hit counts are skewed and inaccurate for various reasons
1. They are inflated by your own hits
2. They are inflated by bots, crawlers, and other "unreal" or "ghost" visitors, these are not actual visitors to your sites. They are just scripts doing their robot tasks. Thinking of these as actual people reading your posts will lead to an unrealistic scenario
3. Services such as Google Analytics are much more accurate at handling scripts and creating a detailed analysis and profile of your website visitors. It will do you much more good if you use a script such as Google Analytics for this. You can use our Joomla Google Analytics plugin to do this.
As you can see throughout our site, we've disabled most places where Joomla hits appear, because we believe these are useless, literally a waste of resources. If you want to know who is hitting your site, use Google Analytics. If you want to impress your visitors with the number of page views you've got, add some social buttons. They're much more prone to bring plenty of traffic, and of course, they are actually accurate.
Joomla 1.5
Activating the Joomla Cache is also straightforward. From the Global Configuration, click on System Tab, and on the right-hand side there is the Cache Settings section. Click Yes on Cache Settings, and put a reasonable amount in minutes (60 minutes should be quite good for most websites). Once you press Apply, Caching will be enabled.
Joomla 1.0
The standard Joomla cache is enabled from Site > Global Configuration > System > Cache Settings (or Site > Global Configuration > Cache tab for Joomla 1.0), and mark it as enabled.
Though there are components written for caching the out of the box caching will give your website an instant boost.
Frequently Asked Questions
What is a cache?
A cache is a mechanism that stores a temporary copy of the content on local fast storage (such as disk or memory) so that the server does not have to fetch the content from the database every time a visitor hits a website. This makes the load time of a site much faster.
How do I enable the Joomla cache?
There are various options to enable the Joomla cache. The simplest method is to enable this via the Joomla core, in the Global Configuration, under System in the Cache Settings section. Simply enable the Cache to On - Conservative caching. You also should enable the Page cache plugin under the Extensions > Plugins for page-level caching. You should also look at this article for several other advanced options for caching.
How do I clear the Joomla cache?
To clear the Joomla cache, simply go to System > Clear Cache and click on Delete All.
Conclusion
Above we've seen the various ways you can enable Joomla cache, both from the core or using external and advanced components to make your website faster. Do drop us a line and let us know if we've missed anything.
