What's the one thing you always do when you create a website? Add Google Analytics of course. The very reason for creating a Wordpress website in the first place is so that it generates web traffic so you should make sure that the site's traffic is being tracked by Google Analytics! If you've been around the web for a while, do you remember those Hit Counters which looked a little bit like this?
{autotoc}
Thankfully, those have been dead and buried a long time. Google Analytics provides any website owner with many tools to monitor their traffic, the best sources of their traffic, whether the website is achieving its goals (whatever those may be) and so many other handy tools necessary for the demands of today's website.
How do I add the Google Analytics code to my WordPress theme?
It's very easy to add Google Analytics to WordPress - you should be able to do it correctly in less than a minute.
Step 1: Create a new property for your website in Google Analytics
This is fairly simple - sign up to Google Analytics and create a property for your website. You'll soon be given a code snippet (javascript) which you'll need to add to your WordPress theme. You can see an example of the code which is generated for inserting into your WordPress site below. Copy this code, you're going to need it in a minute.
![]()
Step 2: Add your Google Analytics code to your WordPress theme
Now comes the fun part. You'll need to add the code to a specific file which is executed on each page, such that the Google Analytics code is added to each page on your Wordpress site. Luckily, a file which does exactly this already exists. It's called the header.php file and we're going to use it to insert our tracking code.
Log on to your Wordpress admin, and go to Appearance > Editor
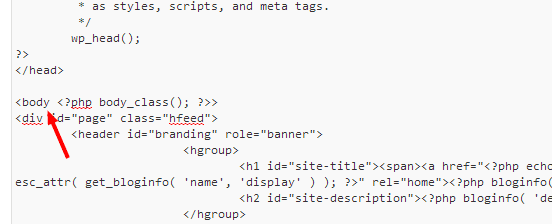
Find the file called header.php. Google recommends that the tracking code goes immediately after the opening<body>tag, so find the <body> tag and in the next line, paste the code which you've copied from the .js Tracking Info page in Google Analytics and click on Update File to save your changes.

Step 3: Confirm with Google Analytics that the code is sending data

The final step is to confirm that everything is working ok. You can do this by Google back to Google Analytics, in the Tracking Info page. You should see that the Tracking Status has changed to "Receiving data". If it isn't, then you have done something wrong. You should first check that the code actually appears on your website by visiting your site and doing a "view-source" and searching for analytics.js to confirm that the code exists on the page. If it isn't you probably missed a step somewhere.
Step 4: Start analysing your website's traffic
The great thing about Google Analytics on a WordPress website is that you don't have to even wait to start seeing what is happening on your site. Visit the Real-Time section of Google Analytics and you can immediately start monitoring your website's traffic.
Need help getting stuff done in WordPress? Try these top-rated affordable gigs on Fiverr!
Click here to find experts on WordPress customization.
Click here to create a full WordPress website.


